

A beginner's guide to making API requests with Javascript. Building a movie app.


This is my first installment in my node-God series. it is a series focused obviously on nodeJS. But before we jump into backend fully, lets warm our hands up with a vanillaJS project and tinny tiny sprinkle of node
As already stated above, we will be building a movie app using html, css, vanillaJS, Axios and nodejs(not instrumental to the code. only to help you host the project online).
You can find the completed project here on Github . If you have further questions, comments or requests, reach out to me on Twitter.
Prerequisites:
Basic html and css knowlege.
How to use the terminal (also known as command line, command promt...)
familiarity with intermediate javascript (nothing out of the ordinary. almost basic)
An IDE (example: vscode, sublime, atom)
That being said, lets get right to it.
1. Initialize the project
Setup:
you need to node installed on your computer. Not just for this project(where we would barely use it) but for our future projects. You can install node from here. you would also need a terminal to run the commands.
Steps:
open your terminal and create the project folder.
mkdir node-projectsNavigate to the folder
cd node-projectscreate the movie-app folder in the projects folder
mkdir movie-app
Navigate to the folder.
cd movie-app
- open the folder on your IDE(aka text editor.) My preferred text editor is vscode.
code .
This opens the folder on vscode. Don't close the terminal (command prompt) as we would still use it during the course of this project.
2. Setting the project up on Vs code.
Steps:
- on the top left corner of visual code, you should see the name of our project(movie-app).beside it, little icons for creating a file, folder etc.
Create a public folder. In the public folder, create two additional folders(css and js). in the css folder, create a file named index.css and in the js folder, create a folder called index.js
Then, navigate back to the root folder (public folder) and create two files(index.html, movie.html).
- open the index.html file by clicking on it.
Then using a vscode shortcut (shift + 1 [this should bring out an exclamation mark] then hit enter).
your screen should look like this.
3. Lets start coding
Index.html:
change the title to movie info
create a link tag for adding stylesheets. we will be using bootswatch for styling as well as css. you can choose your own theme here on bootswatch. I am using the cyborg theme.
<link rel="stylesheet" href="https://bootswatch.com/4/cyborg/bootstrap.min.css">
<link rel="stylesheet" href="css/index.css">
Now, we head on to the body tag where we create our nav tag with some bootstrap syntax
  <nav class="navbar navbar-default">
        <div class="container">
            <div class="navbar-header">
                <a class="navbar-brand" href="index.html">Node-god movie app</a>
            </div>
        </div>
    </nav>
- Next, we build the search box
 <div class="container">
        <div class="jumbotron">
            <h3 class="text-center">Search For Any Movie</h3>

            <form id= "searchForm">
                <input type="text" class="form-control" id="searchText" placeholder="search Movies...">
            </form>
            <br>
                <h6 style="float: right;">
                    <em>Hit Enter</em>
                </h6>
        </div>
    </div>
- we create a div where the results will be displayed.
 <div class="container">

        <div id="movies" class="row"></div>
    </div>
- Finally, before rounding up the html section, we add our script tags.
  <script src="https://code.jquery.com/jquery-3.5.1.min.js" integrity="sha256-9/aliU8dGd2tb6OSsuzixeV4y/faTqgFtohetphbbj0=" crossorigin="anonymous"></script>
    <script src="https://unpkg.com/axios/dist/axios.min.js"></script>
    <script src="js/index.js"></script>
NodeJS:
Remember I said we are going to be using a little bit of node? well, we want to be able to view what we are building in real time on the server. That's the first place node comes in. I am not going to go in depth about node here(coming articles will talk about it). For now, we would be using node and express to create a server(Recommended).
- First we confirm node is properly installed by running this command on the terminal.
node --version
if node was installed properly, you should see the version of node installed on your system
- Next, we install express using NPM. NPM means node package manager. but before installing express, we will initialize the project with npm to create package handler. sorun the following commands on the terminal. First to initialize the project and second to download express.
npm init -y
express and axios
npm install express axios --save
Back in our vs code, create a file in the root folder of the entire project (that is,outside the public folder) called server.js.
server.js:
- First we require the express and axios modules we downloaded earlier. Then we initialize the express module to a variable called app
const express = require('express');
const axios = require('axios');

const app = express();
- use express to render static files
app.use(express.static('public'));
- Finally, we setup our local port where our project will be hosted
app.listen(3000, () => console.log('server is running on 3000')
- If you decide to open the html on your browser, it should look like this,

Index.css
- we set the width and the height to make it mobile friendly
#movies img, #movie img {
    width: 100%;
}
@media (min-width: 960px) {
#movies .col-md-3 .well{
    height: 390px
}

#movies .col-md-3 img{
    height: 240px
}

}
Index.js
- First we write a function that creates an event for when the form is submitted(that is, your search query), then calls the getMovies function which we would write next then prevent the function from submitting the results to a file whichis the default.
$(document).ready(() => {
    //creating an event for when the form is submitted
    $('#searchForm').on ('submit', (e) => {
        let searchText = $(`#searchText`).val();
        //calling the function get movies
        getMovies(searchText);
        e.preventDefault(); //prevents it from submitting to a file
    })
})
- Next is the getMovies function which makes a GET request to the IMDB api.
function getMovies (searchText) {
   axios.get('https://www.omdbapi.com/?i=tt3896198&apikey=90c3d50c&s='+searchText)
   .then((response) => {
        console.log(response);
        let movies = response.data.Search;
        let output ='';
        $.each(movies, (index, movie) => {
            output += `
            <div class="col-md-3">
                <div class="well text-center">
                <img src="${movie.Poster}">
                    <h5> ${movie.Title} </h5>
                <a onclick="movieSelected('${movie.imdbID}')" class= "btn btn-primary" href="#">Movie Details</a>
                </div>
            </div>

            `;

        })

        $('#movies').html(output) // passing the output
      })
 .catch((err) => {
     console.log(err)
 })
}
- we write a function for what happens when movie details is clicked, passing data from one page to another and changing the page (that is, from index to main page).
function movieSelected(id) {  //creating the function for what occurs when movie details is clicked
    sessionStorage.setItem('movieId', id); //passing data from one page to another
    window.location= 'movie.html'; //changing the page
    return false;
}
- Next, is another request to the imdb api to get info such as actors name, release date, plot etc.
function getMovie() {
    let movieId = sessionStorage.getItem('movieId');


    axios.get('https://www.omdbapi.com/?apikey=90c3d50c&i='+movieId)
    .then((response) => {
         console.log(response);

         let movie = response.data;

         let output = `
         <div class= "row">
         <div class="col-md-4">
         <img src="${movie.Poster}" class="thumbnail">
         </div>
         <div class="col-md-8">
            <h2> ${movie.Title}</h2>

            <ul class="list-group">
                <li class="list-group-item"> <strong> Genre: </strong> ${movie.Genre} </li>
                <li class="list-group-item"> <strong> Released: </strong> ${movie.Released} </li>
                <li class="list-group-item"> <strong> Rated: </strong> ${movie.Rated} </li>
                <li class="list-group-item"> <strong> IMDB Rating: </strong> ${movie.imdbRating} </li>
                <li class="list-group-item"> <strong> Director: </strong> ${movie.Director} </li>
                <li class="list-group-item"> <strong> Writer: </strong> ${movie.Writer} </li>
                <li class="list-group-item"> <strong> Actors: </strong> ${movie.Actors} </li>

            </ul>

         </div>
         </div>

         <div class="row">
            <div class="well">
                <h3> Plot</h3>
                ${movie.Plot}
                <hr>
                <a href="https://imdb.com/title/${movie.imdbID}" target="_blank" class="btn btn-primary">View IMDB </a>
                <a href="index.html" class="btn btn-primary">HOME</a>

            </div>


         </div>

         `;
         $('#movie').html(output);
       })
  .catch((err) => {
      console.log(err)
  })
}
Now, lets test it out shall we?
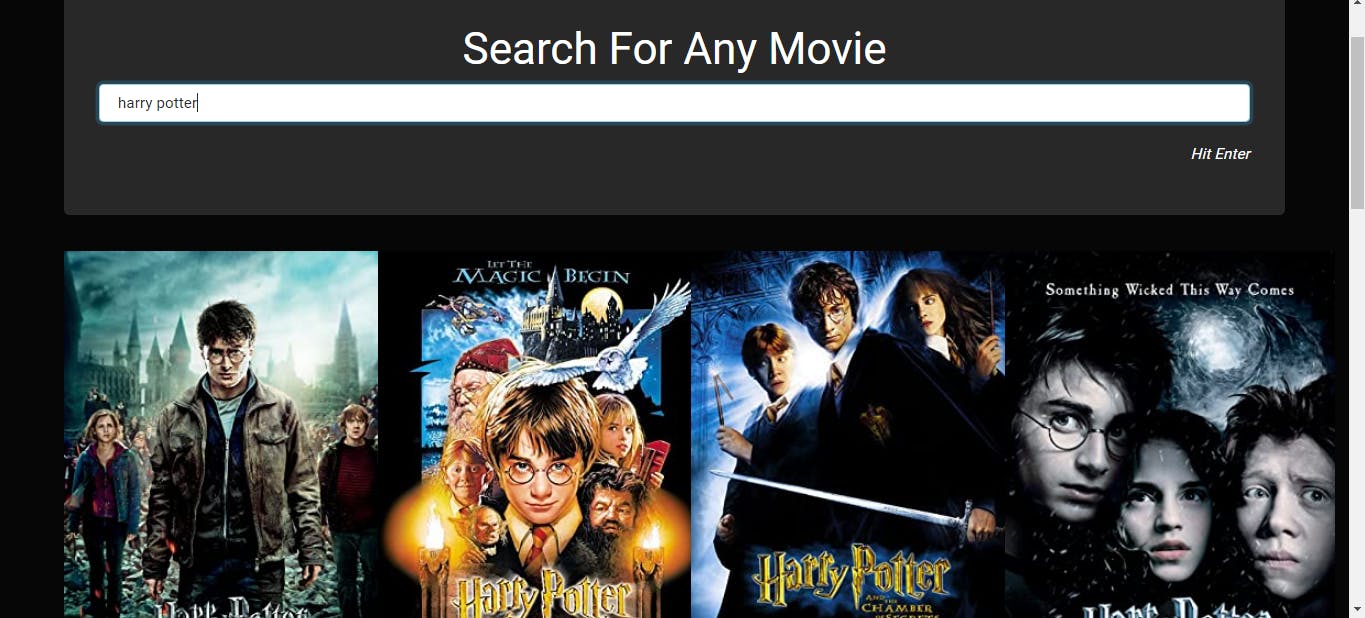 This is what happens when we search for harry potter (because i am a potter head). Now, lets getto building the info page.
movie.html
Not much difference from the index.html. This is where the info and plot about the movie will be displayed.
First, copy all the items from the index.html file and paste it here. Then delete everything in the body excluding the div that contains the nav tag.
Add this div to the body section.
 <div class="container">

        <div id="movie" class="well"></div>
    </div>
- Also in the scripts section, add a new script.
 <script>
        getMovie();
    </script>
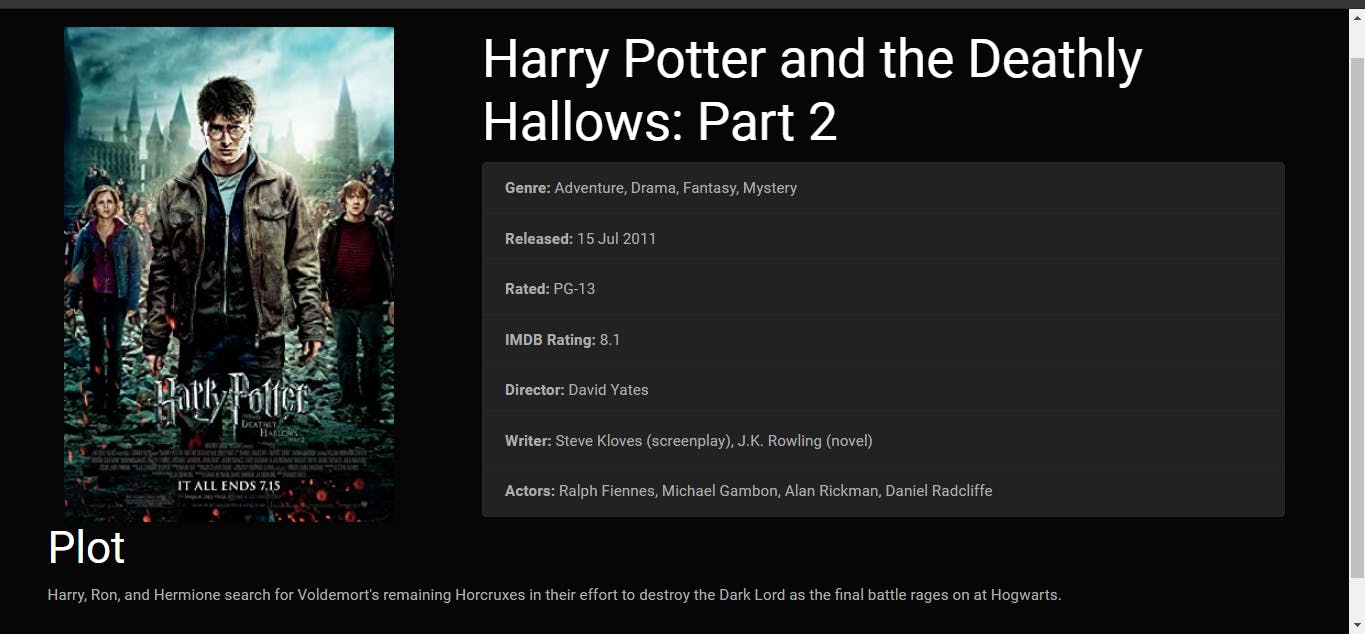
Your main.html page should look like this
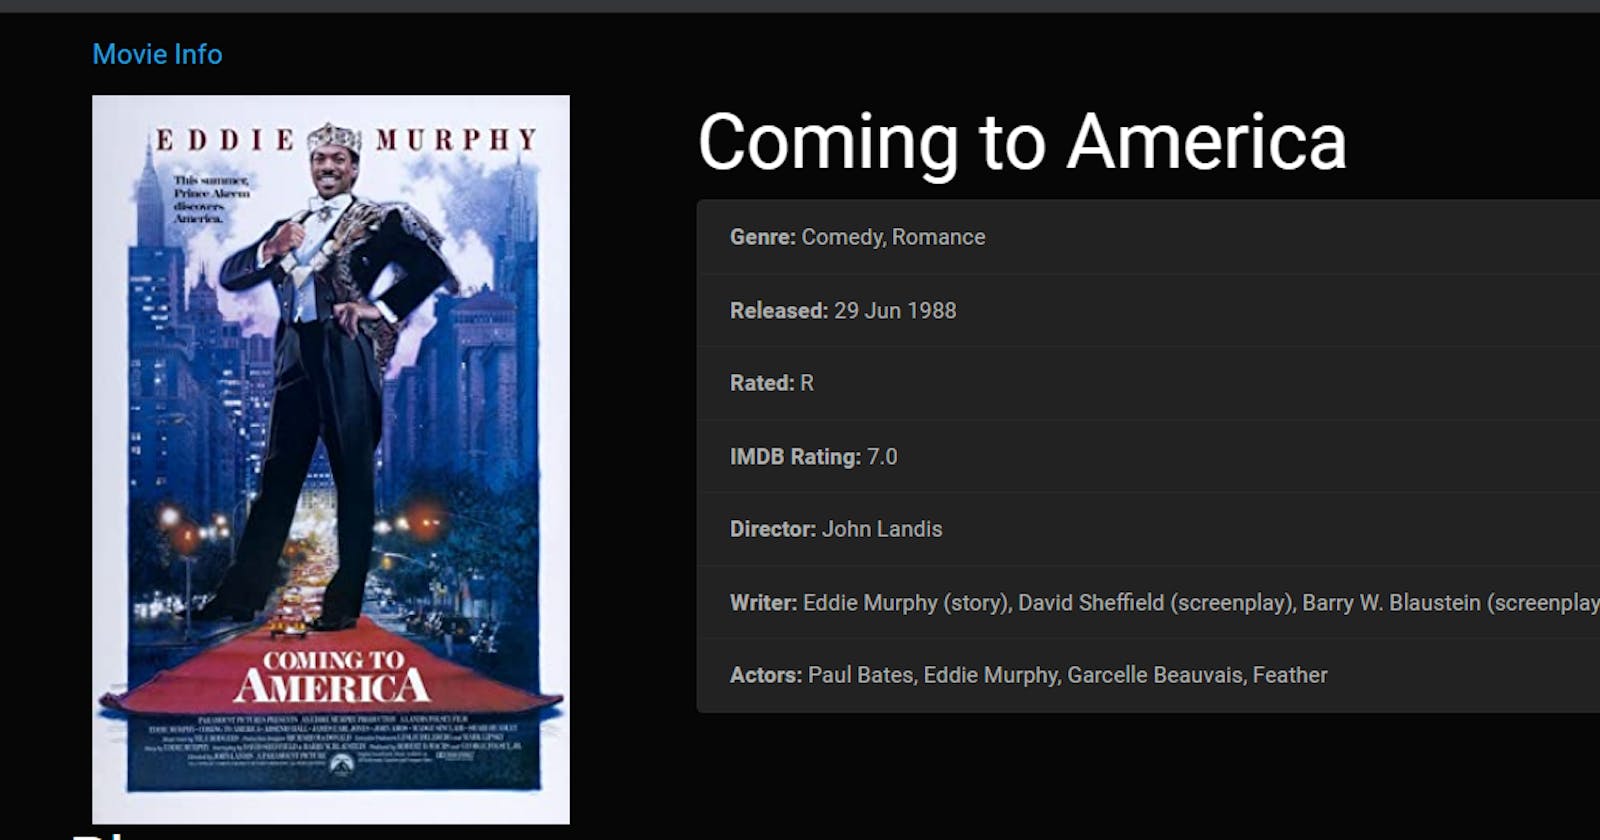
Now lets test it out. if I go to the home page and search for harry potter, this is what I will get if I click on movie details for harry potter and the deathly hollows.
That would be all ladies and gentlemen!
Conclusion:
Now, you have sucessfully built something using an api. Now, the reason i opted for nodejs as opposed to liveserver, was so you could upload your code to github easily and even host it on platforms like heroku. This is my first attempt at writing a technical article. Leave a comment and tell me what you think. if you encounter any challenges or notice any errors, do reach out